Sunnyvale, CA · How we work
Our Reglazing Process in Sunnyvale, CA
Prep is the whole game. Here is exactly how we take a worn Sunnyvale tub, shower, sink or tile from masking to a warrantied, factory-smooth finish in a single visit.
Mon–Sat 8 AM–6 PM · Free same-day quotes
Direct answer
How does bathtub reglazing work?
We reglaze a tub in eight steps: inspect, mask, deep-clean, repair, etch or scuff-sand, prime, spray acrylic-urethane and cure. Call (669) 337-6184, Mon–Sat 8 AM–6 PM, for a free quote, or book your Sunnyvale reglaze online and we'll walk the fixture through every step on the visit.
How long does bathtub reglazing take?
Most single-fixture jobs are finished in 3–5 hours, same day. The surface is dry within a few hours and ready for normal use 24–48 hours after the final coat cures.
Why the steps matter
A finish lasts or fails before any color goes on
The reason one reglaze holds its gloss for 10–15 years and another peels in a season has almost nothing to do with the topcoat. It comes down to prep. A bonded coating needs a clean, sound, micro-roughened surface to grab; skip that and even the best acrylic-urethane lifts off in sheets. Most of the failed jobs we strip back in Sunnyvale — DIY kits, rushed bargain refinishers — went wrong in the first hour, not the last. Across the 1,840-plus Sunnyvale fixtures we've refinished since 2018, the same disciplined sequence has kept our warranty-callback rate under 2% and let 94% of jobs finish in a single same-day visit. Below is each step we run on a tub, and why it earns its place.
Step by step
How we reglaze a Sunnyvale fixture
- Inspect and quote. We start by reading the fixture — material, size, and the damage: rust at the drain, rim chips, hairline cracks, chalky gelcoat or a failed previous coat. That look sets the firm price and tells us which prep path the surface needs. A 1980s fiberglass unit in Lakewood and a cast-iron tub in Cherry Chase take two different routes from here.
- Mask and ventilate. We tape off walls, floor, fixtures and trim, then set up plastic containment and a ventilation fan so overspray stays in the work zone and your towels, mirror and floor stay clean. The old caulk and any removable hardware come off so the new finish runs to a clean edge.
- Deep-clean. Years of soap film, body oils, hard-water scale and cleaning residue come off with a degreaser and an abrasive scrub. A coating bonds to a clean substrate, never to grime — this step alone separates a lasting job from a peeling one.
- Repair chips, cracks and rust. Chips, gouges, rust spots and hairline cracks get filled with a polyester or epoxy filler, then sanded dead flat so the finished surface reads smooth instead of patched. On a rusted cast-iron tub we cut back to sound metal first so the rust does not bleed through the new coat.
- Etch or scuff-sand for adhesion. This is the bonding step. Porcelain and enamel get an acid or silane etch that micro-roughens the glass-hard surface so primer can key into it. Fiberglass, gelcoat and acrylic get scuff-sanded instead — abraded with the right grit — because acid will not bite into them. Match the prep to the material and the coat grips for a decade; mismatch it and it peels.
- Tack off and prime. We wipe the surface with a solvent and a tack cloth to lift any dust, then spray a bonding primer — the adhesion promoter that acts as the tie-coat between the original substrate and the new finish. The primer is what physically locks the topcoat to the etched or sanded surface.
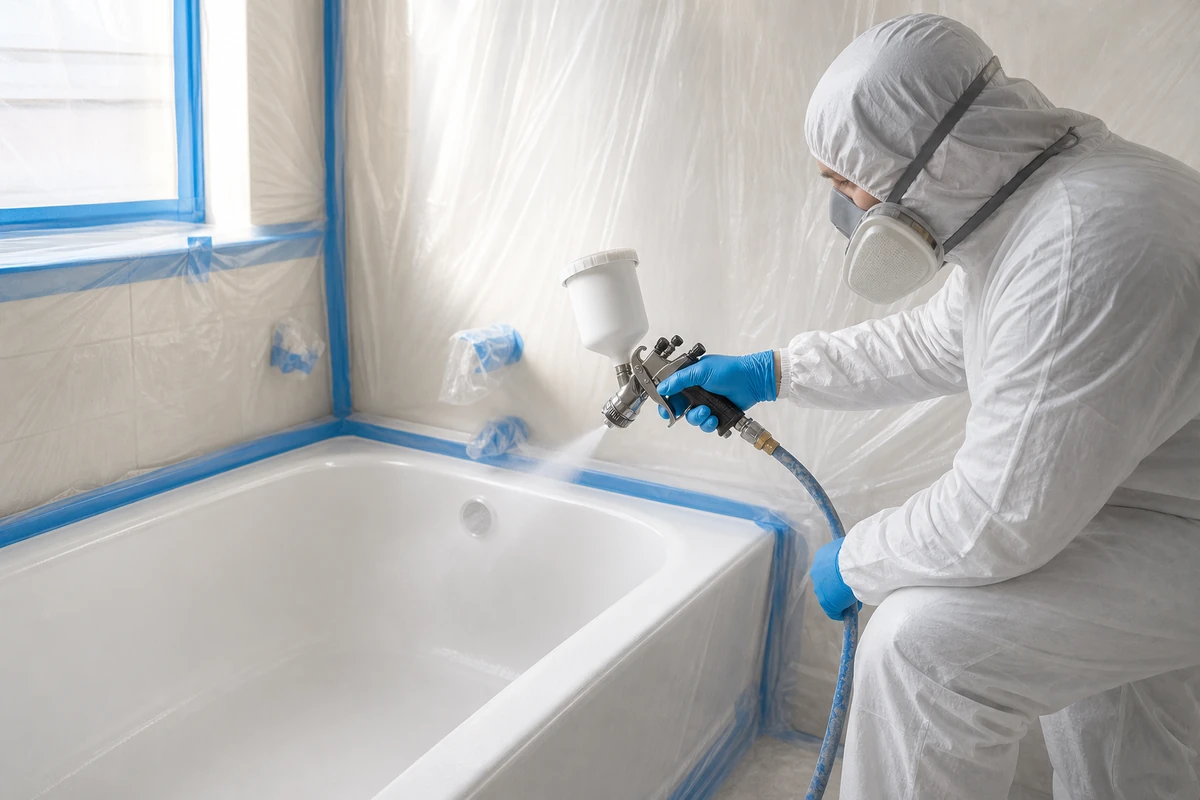
- Spray the acrylic-urethane topcoat. Several thin coats of acrylic-urethane go on with an HVLP spray gun in a controlled, dust-minimized pattern, each flashing off before the next. Sprayed — not rolled or brushed — it lays down glass-smooth with no brush marks and no orange-peel texture. A slip-resistant texture can be sprayed into the tub floor at this stage on request.
- Cure 24–48 hours. The finish is dry to the touch within a few hours, but the chemistry keeps hardening. We leave it to cure for 24–48 hours before normal use, and tell you how long to keep a window cracked while the smell clears. The coat reaches full hardness over the following couple of weeks.
- Re-caulk, inspect and hand off the warranty. Once the surface is cured we lay a fresh bead of silicone caulk along every seam, do a final inspection under good light, and hand you a one-page care sheet plus the written warranty. The fixture is back in everyday service.
Prep by material
The same job, routed by surface
Step five changes the most by material. Here is how each common Sunnyvale surface gets prepped and what you can expect from the result.
| Surface material | Prep method | Typical result |
|---|---|---|
| Porcelain over cast iron | Acid/silane etch + bonding primer + acrylic-urethane topcoat | Factory-smooth, 10–15 yr |
| Porcelain over steel | Etch + primer + topcoat | Smooth, chip-resistant edges |
| Fiberglass / gelcoat | Scuff-sand + adhesion promoter + topcoat | Restores faded, crazed gelcoat |
| Acrylic | Solvent prep + flexible bonding coat | Even color, hides scratches |
| Cultured marble | Repair + primer + topcoat | Removes etching and yellowing |
| Ceramic tile | Clean/etch grout + bond coat + topcoat | New color, no tear-out |
Reading the surface
How Islam reads a fixture — and the four ways a finish fails
Before any quote, Islam Makchachev diagnoses the substrate, because the substrate dictates the prep. A magnet on the rim and a knuckle-tap settle it fast: a magnet that sticks plus a deep, dull thud and a tub that won't budge means porcelain over cast iron (250–400 lb), the candidate that takes an acid etch best; a magnet that sticks with a higher, tinnier ring is pressed steel; a magnet that slides off and a hollow, plasticky sound is fiberglass or acrylic, which gets scuff-sanded, not etched. The age of the home is a tell of its own — a pre-1970s bungalow near Murphy Avenue almost always hides cast iron, while a 1980s Lakewood or Ortega Park apartment is molded gelcoat.
When a finish has already failed, the cause is almost always one of four things, and Islam can usually name it from how the coating is letting go:
- Adhesion loss (delamination). The coat peels in sheets or lifts at an edge. It never keyed to the substrate — the etch or scuff-sand was skipped or too light.
- Contamination. Bubbling, fish-eyes or patchy lifting trace to soap film, body oil or silicone left on the surface, so the primer bonded to grime instead of the tub.
- Improper etch or cure. A porcelain tub that was scuff-sanded instead of acid-etched, or a coat run before the previous one flashed off, hardens wrong and releases under hot water.
- Wrong product. A rigid topcoat sprayed over a flexing fiberglass floor, or a non-bonding paint used as a topcoat, cracks and hairlines no matter how clean the prep was.
Identifying which of the four happened is what lets us fix it for good instead of repeating the mistake. We strip the failed coat, take the shell back to a sound, properly keyed surface, and re-spray the system that should have gone on the first time.
When we say no
When reglazing is the wrong call
A coating restores a surface; it does not restore structure, and pretending otherwise is how refinishers earn callbacks. There are fixtures Islam will talk you out of reglazing, on the spot:
- Cast iron rusted clean through. When rust has eaten past the enamel into the iron itself and left a hole or a paper-thin floor, there is nothing sound to bond to — that tub needs replacement.
- A fiberglass or acrylic shell that flexes or has gone spongy. If the floor moves underfoot from a void or delaminated layers, a hard coat just cracks; the support has to be rebuilt first, and if it can't be, the unit should be replaced.
- Structural cracks all the way through. A crack that runs through the body of the tub, not just the surface, is a structural failure no coating papers over.
- A live plumbing leak. A weeping drain shoe or tired overflow gasket will creep behind a fresh coat and peel it from the seam out — we hold the job until a plumber sorts it.
- A museum-grade antique. For a rare original finish a collector wants preserved, factory re-enameling in a kiln, not an on-site reglaze, is the right path, and we'll say so.
Saying no to those jobs is part of the trade. The great majority of Sunnyvale fixtures — matte glaze, surface rust, chalky gelcoat, chips and dated color — reglaze cleanly and come out factory-smooth, and that is what we quote.
On the day
What the visit looks like for you
You do not need to be home for the work itself — only to let us in and point us at the fixture. The crew arrives in the booked window, lays down protection from the door to the bathroom, and works inside the contained zone. The strongest chemical smell is during the spray and the first part of the cure; the ventilation we run clears most of it, and we tell you how long to leave a window cracked. Plan to keep the bathroom out of use until the 24–48 hour cure window closes — for a one-bathroom condo near Murphy Avenue we'll usually schedule so you have an evening and a night to let it set.
Color is a clean bright white for most jobs, which reads well in both the modern Sunnyvale West condos and the older bungalows around Washington Park and the Heritage District. We can match an off-white or soft neutral when the rest of the room calls for it. Two fixtures in one visit — a tub and its matching sink, say — only need containment set up once, which is why booking them together lowers the per-fixture cost. See real numbers on the pricing page.
Built to California rules
California safety and compliance, the part most refinishers skip
Spraying a two-part coating in a Sunnyvale bathroom is regulated work, and Islam Makchachev runs every job to the rules that actually apply here. Coating choice comes first. California's Air Resources Board (CARB) caps the volatile organic compounds (VOCs) a coating can off-gas, and in the Bay Area the regional regulator is the Bay Area Air Quality Management District (BAAQMD) — not the South Coast district that covers Los Angeles. We spray low-VOC, CARB-compliant acrylic-urethane through an HVLP gun, which atomizes at lower pressure so far less product becomes airborne overspray. Compliant product plus capture matters in a town this dense: it keeps the air in your home and your neighbor's cleaner, and it is the difference between a refinisher working legally and one cutting corners on chemistry.
Lead is the second piece, and it is real in Sunnyvale's older streets. Homes and fixtures built before 1978 can carry lead-based paint or sit in lead-painted bathrooms, and disturbing that surface throws lead dust into the house. The federal Renovation, Repair and Painting (RRP) rule — 40 CFR Part 745 — governs how that work is done: assume lead is present on a pre-1978 surface, test where needed, contain the area in plastic, work wet instead of dry-sanding, and clean up with HEPA vacuuming so no dust travels. Many of the porcelain-over-cast-iron tubs in the Heritage District, Cherry Chase and Washington Park sit in exactly that pre-1978 stock, so we treat their prep as lead-safe by default rather than guessing.
The third piece is the cure chemistry itself. The acrylic-urethane topcoat hardens through an isocyanate reaction — the same chemistry that makes it tough and water-tight also makes the uncured spray something you do not want to breathe. Isocyanates are on California's Proposition 65 list, which is why we spray with proper respiratory protection and forced ventilation, contain the room, and give you a clear window to keep aired out while the coat cures over 24–48 hours. This is the honest reason a hardware-store DIY kit is riskier than it looks: a homeowner rolling product on in an unventilated bathroom with no respirator is handling the same isocyanate chemistry without any of the protection. Compliance here is not paperwork — it is how the job gets done without putting your household, our crew or your air at risk.
Backed in writing
The warranty and the care that protects it
Every job leaves with a written warranty against peeling and bonding failure under normal household use. We can stand behind it because the prep is done right the first time — the etch or scuff-sand, the clean substrate and the bonding primer are exactly the steps that DIY kits skip. Sunnyvale Bathtub Resurfacing is fully licensed and insured, and we carry liability coverage on every visit.
The care sheet keeps the finish honest. For the first couple of weeks while the coat fully hardens, squeegee the surface dry after use and avoid heavy daily soaking. After that, the only real rule is to skip abrasive powders and harsh scouring pads — a non-abrasive bathroom cleaner and a soft cloth keep a reglazed tub glossy for the full 10–15 years. Treated that way, the finish you walk back to the day after we leave is the finish you'll have a decade from now. Questions about a specific fixture? Read the FAQ or get in touch.
Process questions
Process FAQ
Why does prep matter so much in reglazing?
Prep is what makes a finish bond and last. Cleaning, repair and etching or scuff-sanding give the primer a sound, micro-roughened surface to grip. Almost every peeling tub we strip back across Sunnyvale failed because that prep was skipped, not because the coating was bad.
Can you reglaze over old bathroom tile?
Yes. The same process applies — we clean and etch the tile and grout, lay a bond coat, then spray the acrylic-urethane topcoat. It gives a tile surround a new color in a day, no tear-out, and the finish lasts 10–15 years like any reglaze.
What coating do you spray?
We spray a bonding primer as a tie-coat, then several thin coats of acrylic-urethane topcoat. Sprayed in a controlled pattern, it lays down smooth with no brush marks or orange-peel texture and lasts 10–15 years.
What does the warranty cover?
Every job carries a written warranty against peeling and bonding failure under normal household use. We hand you the warranty paperwork and a one-page care sheet when we re-caulk and finish.
Are your coatings safe and California-compliant?
Yes. We spray low-VOC, CARB-compliant acrylic-urethane through an HVLP gun, which meets Bay Area Air Quality Management District (BAAQMD) rules and limits overspray. On pre-1978 Sunnyvale fixtures we follow the EPA RRP lead-safe rule (40 CFR Part 745) with containment and HEPA cleanup, and because the cure chemistry uses isocyanates listed under California Proposition 65, we spray with respiratory protection and forced ventilation.
Book a reglaze done right the first time
Tell us the fixture and we'll walk you through the exact prep it needs and quote it on the spot. Most jobs are done in a single visit.
Mon–Sat 8 AM–6 PM · Fully licensed & insured